Synchronizing into the Store
Once your desired courses have been prepared, you can now synchronize them from the Lambda Store admin panel.
1. On the Lambda Store admin panel, click Catalog > Synchronize with LMS to access the Synchronization Options page.
2. Review the course options that you would like to synchronize and that you would like to ignore, and then click Review Changes. If you would like to reset the options to their original settings, click Reset Options.

 NOTE
NOTE
Previously-synchronized courses will be resynchronized into the Lambda Store with each synchronization.
If you would like to keep any changes that you have made separately on your Lambda Store website, then set the Update [option] to No.
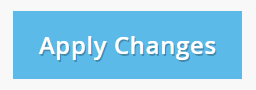
3. The Synchronization Review page will show you all of the synchronization updates that will occur. If you are satisfied with these updates, click Apply Changes.
Once the synchronization is complete, you will be redirected to the Applied Changes page, which lists all of the synchronization updates - including the synchronization of your courses.
Preparing Your Courses for Sale
After synchronizing your courses into the store, the courses become 'products' that must be prepared for sale.
1. In the Lambda Store admin panel, click Catalog > Products to access the Products page.
2. Find your desired course on the grid, and click Edit under the Action column. This will redirect you to the course's Product Editing page.
3. If you would like the course to be initially visible to customers on the website, set Enable Product to Yes. However, you can set Enable Product to No until your courses are fully prepared. Note that if you have a date set in the Product Available From under Product Availability, the toggle will revert to Yes so you will want to clear that date field)
4. Adjust the individual Price of your course. The admin panel creates a default price when your store is set up by the Lambda team. However, you may need to update this final price for the store website.

5. If you would like to limit the number of available class seats, adjust the Quantity of your course. The default setting is empty, so you must add a quantity to ensure that the course is available to purchase. 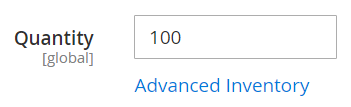
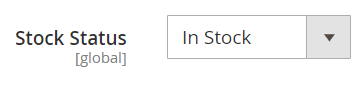
6. When your course has available seats, set the Stock Status to 'In Stock' so that the course can be visible from the website.
 NOTE
NOTE
If you have your Inventory Settings turned off, then you do not need to configure your course's Quantity and Stock Status settings.
7. The default visibility setting, 'Catalog, Search', allows the product to be accessed through viewing the catalog or using the search panel. You can keep this default setting, or select 'Catalog,' 'Search,' or 'Not Visible Individually' in the drop-down menu.

NOTE
Setting your product visibility to Not Visible Individually will result in your product not being accessible unless it is part of a bundle or combined product. If you would like to 'hide' your course, then set Visibility to Search, or add it to a hidden Catalog.
8. Scroll down and expand the Images and Video section. This section allows you to upload promotional course images and videos.
Upload your image into the Add Image box.

If you would like to upload a promotional course video, then click the Add Video button on the right-hand size of the screen.

 TIP
TIP
Adding the right images and videos can help attract customers and boost your sales. Click here if you would like to learn more about enhancing product descriptions on the Lambda Store.
11. Scroll down and expand the Enrolment Settings section. This section is mandatory for all products, and allows you to determine the enrolment dates for courses and virtual products.
12. Expand the Enrolment Start section. Select an appropriate option from the Start Type drop-down menu and configure any corresponding settings.
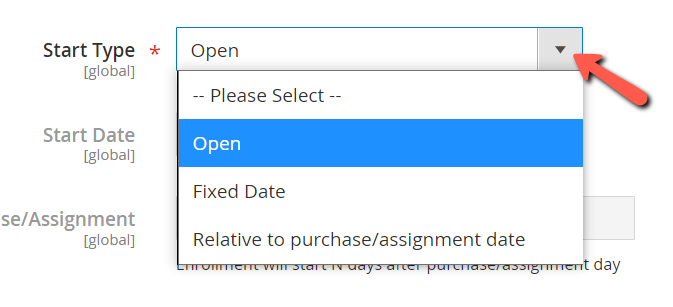
Open: Allows learners to be immediately enrolled once they have purchased the course.
Fixed Date: Sets a fixed date that learners must wait until to be enrolled into the course.
Relative to Purchase/Assignment Date: Sets a period of time after purchase that learners must wait until to be enrolled into the course.
13. Expand the Enrolment End section. Select an appropriate option from the End Type drop-down menu and configure any corresponding settings.
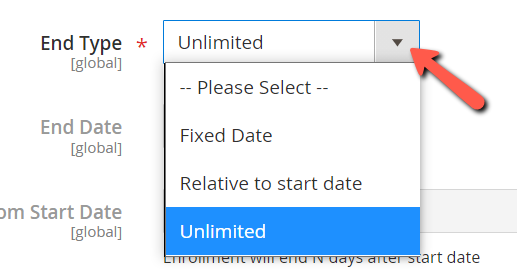
Unlimited: Allows learners to take as long as necessary to complete a course.
Fixed Date: Sets a fixed date that learners will no longer have access to the program. Every learner purchasing this course will have the same fixed date.
Relative to Start Date: Sets a period of time after starting the course that learners will no longer have access to the course.
If you would like the customer to have unlimited access to the course once they have completed it, then set Unlimited Upon Completion to Yes. Otherwise, set it to No.

TIP
Editing the Enrolment Settings of an existing course will only affect new users. If you would like to edit the enrolment settings of users who have previously enrolled in the course, click here to learn more.
14. Once you are complete, click Save.

Adding Locks to Your Products
Store administrators can control the access of certain courses in the Lambda Store website through creating product locks. Once a product is locked, customers have to enter the unlock code to be able to purchase the course. Store administrators can also view which products have been unlocked by a particular customer account.
 Setting Up Unlock Codes
1. Go to the Lambda Store admin panel and click Catalog > Products on the sidebar menu to access the Products page.
2. Find your desired product on the grid, and click Edit in the Action column.
3. On the product editing page, scroll down and expand the Unlock Product Code section.
4. Enter an unlock code of your choice and click Save.

Once you have saved the product, it becomes locked on the Lambda Store website. It now requires the unlock code to become purchasable. Once a customer unlocks a product, they will always have access to it and will not need to re-enter the code at a later date.
 Viewing Unlocked Products Under a Customer Account
1. On the Lambda Store admin panel, click Customers > All Customers to access the Customers page.
2. Find your desired customer account, and click Edit in the Action column.
3. On the Customer Information sidebar, select Unlock products.
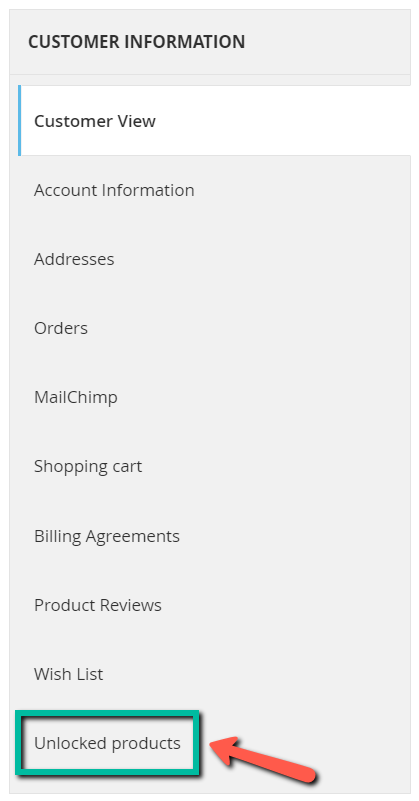
On this page, you will be able to see all unlocked products under this customer account.
Comments
Article is closed for comments.